Automating Deployments with GitHub Actions
This guide will walk you through how to automate your deployments with GitHub Actions. This is useful for deploying your application to your servers when you push to your repository.
Default Behavior
By default, Spin Pro comes with a GitHub Actions workflow that will deploy your application to your server when you push to your main branch in your repository. This workflow is located in the .github/workflows directory of your repository. You can customize this workflow to fit your needs.
Creating a dedicated "deploy user"
To deploy your application with GitHub Actions, you'll need to create a dedicated "deploy user" on your server.
Create a dedicated public-private key pair
To create a dedicated public-private key pair, you can use the following command:
Create a dedicated public-private key pair
ssh-keygen -o -a 100 -t ed25519 -f ~/Desktop/id_ed25519_deploy -C deploy
This command will create a new key pair in the ~/Desktop directory with the name id_ed25519_deploy. You can replace deploy with your username.
Do not use a passphrase for the key. This will prevent GitHub Actions from being able to use the key to connect to your server.
It will create two files:
Files created
~/Desktop/id_ed25519_deploy # PRIVATE key
~/Desktop/id_ed25519_deploy.pub # PUBLIC key
We will need to reference the content of both files in the next steps.
Add the PUBLIC key to .spin.yml
You can uncomment the docker_user.authorized_keys section in your .spin.yml file and add the value of your .pub file to the authorized_keys section.
Add the public key to .spin.yml
docker_user:
  username: deploy
  uid: 9999
  group: deploy
  secondary_groups: "docker"
  gid: 9999
  authorized_ssh_keys:
    # 👇 Change this value to your public key value
    - "ssh-ed25519 AAAAC3NzaC1lZDI1NTE5AAAAIKNJGtd7a4DBHsQi7HGrC5xz0eAEFHZ3Ogh3FEFI2345 fake@key"
Notice how we're creating a dedicated user named deploy with a uid and gid of 9999. We will use this user to run deployments instead of using a general user like alice or bob to deploy. This user is strictly for deployments.
Run spin provision to update your server
After this is complete, you can run spin provision to update your server with the new public key.
Configure GitHub Actions Secrets/Environment Variables
If you have multiple environments (staging, production, etc.) a GitHub Team plan is required ($4/user/mo) to access the GitHub Environments feature. This will allow you to set environment variables on a per environment basis.
The following environment variables can be set as secrets in GitHub Actions.
| Variable | Description | Example Value | Required |
|---|---|---|---|
ENV_FILE_BASE64 | The base64 encoded .env file. | ABCDEFG1234... | ⚠️ Yes |
SSH_DEPLOY_PRIVATE_KEY | The private SSH key dedicated for the deploy user. | -----BEGIN OPENSSH PRIVATE KEY-----abc123... | ⚠️ Yes |
SSH_REMOTE_HOSTNAME | The hostname/IP of your server. | server01.example.com | ⚠️ Yes |
SSH_REMOTE_KNOWN_HOSTS | If provided, the SSH connection will validate the connection against your known_hosts file and remove the "SSH_KNOWN_HOST" warning. (Learn more) | github.com ssh-rsa AAAAB3NzaC1yc2EAAAADAQABAAABgQC... | no |
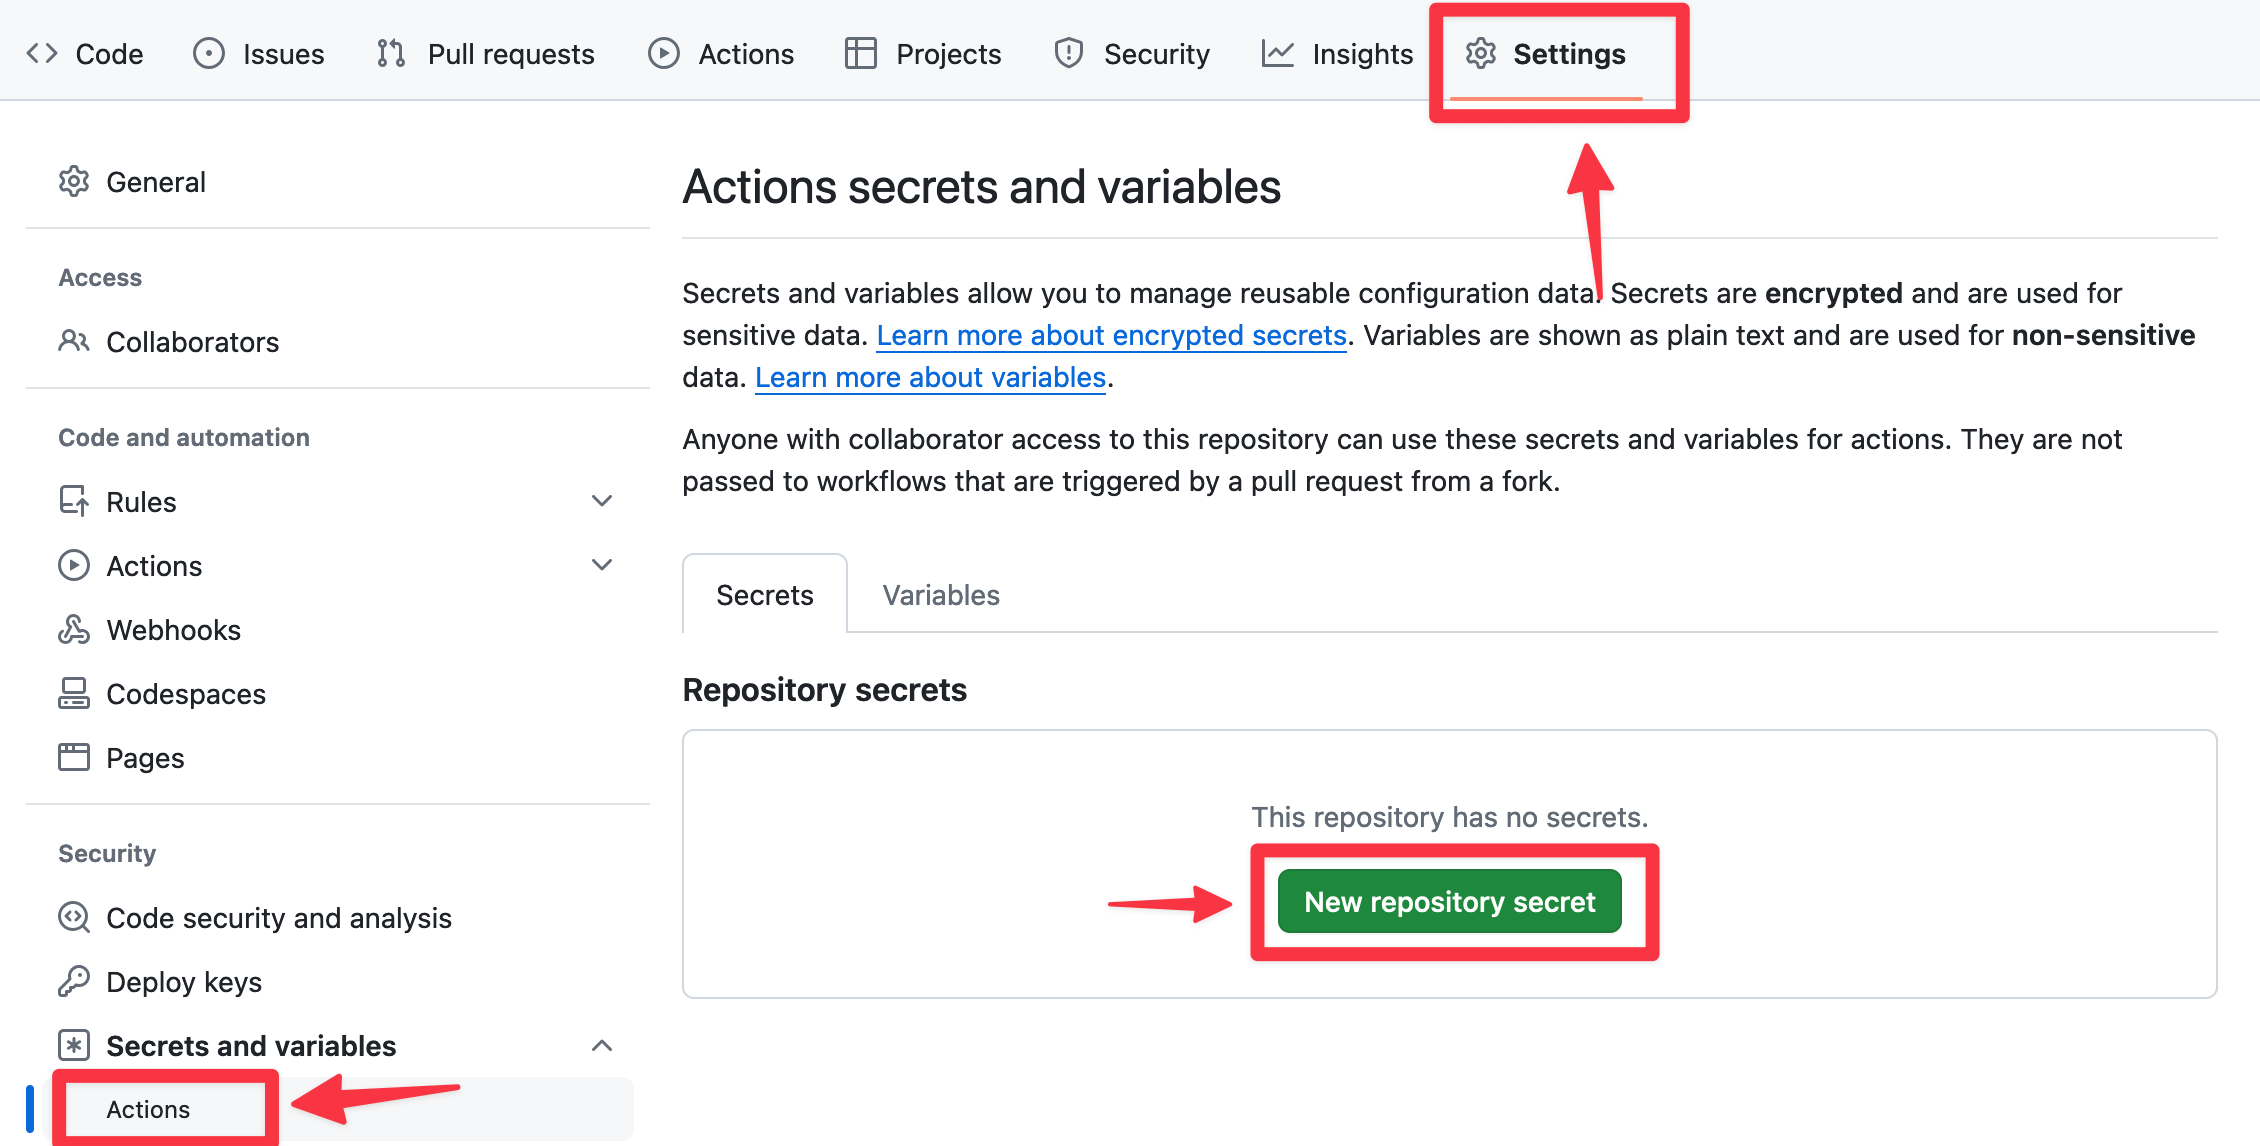
To add these environment variables to your GitHub repository, you can follow these steps:
- Go to your GitHub repository.
- Click on
Settings. - Click on
Secrets and variables → Actions. - Click on
New repository secret
Set the Name to the environment variable name and Value to your value.

The only way you can update a value of a secret is to overwrite the previous value. GitHub Actions does not allow you to view the value of a secret once it's set.
How your ".env" file is used
Your .env file is very important in the deployment process. Not only does it configure your application, but we'll also use the variables during the Docker Swarm deployment to configure your services.
Since Spin uses Docker images as a single source of truth, the only dynamic part of the application between the environments is the .env file. This means that 99% of the time when it's working on one machine and not the other is because the .env file is not set correctly between machines. It's very important to take your time and get this part right.
Some of these variables configure databases on first boot (like DB_DATABASE, DB_USERNAME, DB_PASSWORD, REDIS_PASSWORD). It will create the database and user if they don't exist. If you have a configuration error on first deployment, you may need to delete the database docker volume and re-run the deployment.
👇 It is very important you have these variables set correctly in your .env below. Not all variables are required because it depends on the configuration of your application.
Variables used in docker-compose.prod.yml
| Variable | Description | Source | Example Value |
|---|---|---|---|
SPIN_APP_DOMAIN | The domain of your application. | SPIN_APP_DOMAIN will be used if it's defined in the .env file, otherwise we'll attempt to automatically detect the domain from your APP_URL in .env | myapp.example.com |
DB_DATABASE | The database name. | Loaded from .env | myapp |
DB_USERNAME | The database username. | Loaded from .env | myuser |
DB_PASSWORD | The database password. | Loaded from .env | mypassword |
REDIS_PASSWORD | The Redis password. | Loaded from .env | myredispassword |
REVERB_HOST | The DNS hostname to use for Reverb. (⚠️ must be different than your SPIN_APP_DOMAIN) | Loaded from .env | socket.example.com |
ENV_FILE_BASE64
When you're pasting values into GitHub Actions, make sure you're not pasting any extra whitespace or line breaks.
GitHub Actions requires the .env file to be base64 encoded to prevent interpolation of the values in the file. This adds a few steps, but Spin has a command called spin base64 to help you with this.
Create a text file (it can be called anything). For our example, we will call ours env.txt. Save this securely on your computer or with your password manager.
Paste the contents of what the environment file would look like into this file. For example:
env.txt
APP_NAME=Laravel
APP_ENV=production
APP_KEY=base64:abcdefghijklmnopqrstuvwxyz1234567890=
APP_DEBUG=false
APP_TIMEZONE=UTC
APP_URL=https://laravel.example.com
# Rest of your .env file
Next, you can run the following command to base64 encode the file:
Base64 encode the file
spin base64 -e env.txt # Linux/Windows
spin base64 -e env.txt | pbcopy # Mac
Make sure you're not copying any extra whitespace. With Mac, the pbcopy command will copy the value to your clipboard automatically.
DEPLOYMENT_SSH_PRIVATE_KEY
To get the value of the SSH_DEPLOY_PRIVATE_KEY environment variable, you can get the value of the private key file you created earlier.
Get the value for the SSH_DEPLOY_PRIVATE_KEY
cat ~/Desktop/id_ed25519_deploy #Linux/Windows
cat ~/Desktop/id_ed25519_deploy | pbcopy #Mac
If you're copying the value on Linux or Windows, be sure you're not copying any extra whitespace. With Mac, the pbcopy command will copy the value to your clipboard.
Further customization
If you'd like advanced customization, refer to the following GitHub Actions that we've created. You can customize the workflows in .github/workflows to customize even more options (like SSH ports, different registries, etc.):
You can also refer to the Workflow syntax for GitHub Actions document if you'd like even more customization options.
Running a deployment
By default, a production deployment will run when you push to your main branch. You can customize this behavior by modifying the .github/workflows/deploy.yml file in your repository.
Changing the deployment trigger
You'll see in the default triggers by looking at the on section of the workflow file. Refer to the GitHub Actions documentation for more information if you'd like to change the trigger.
Where to watch the status of your deployment
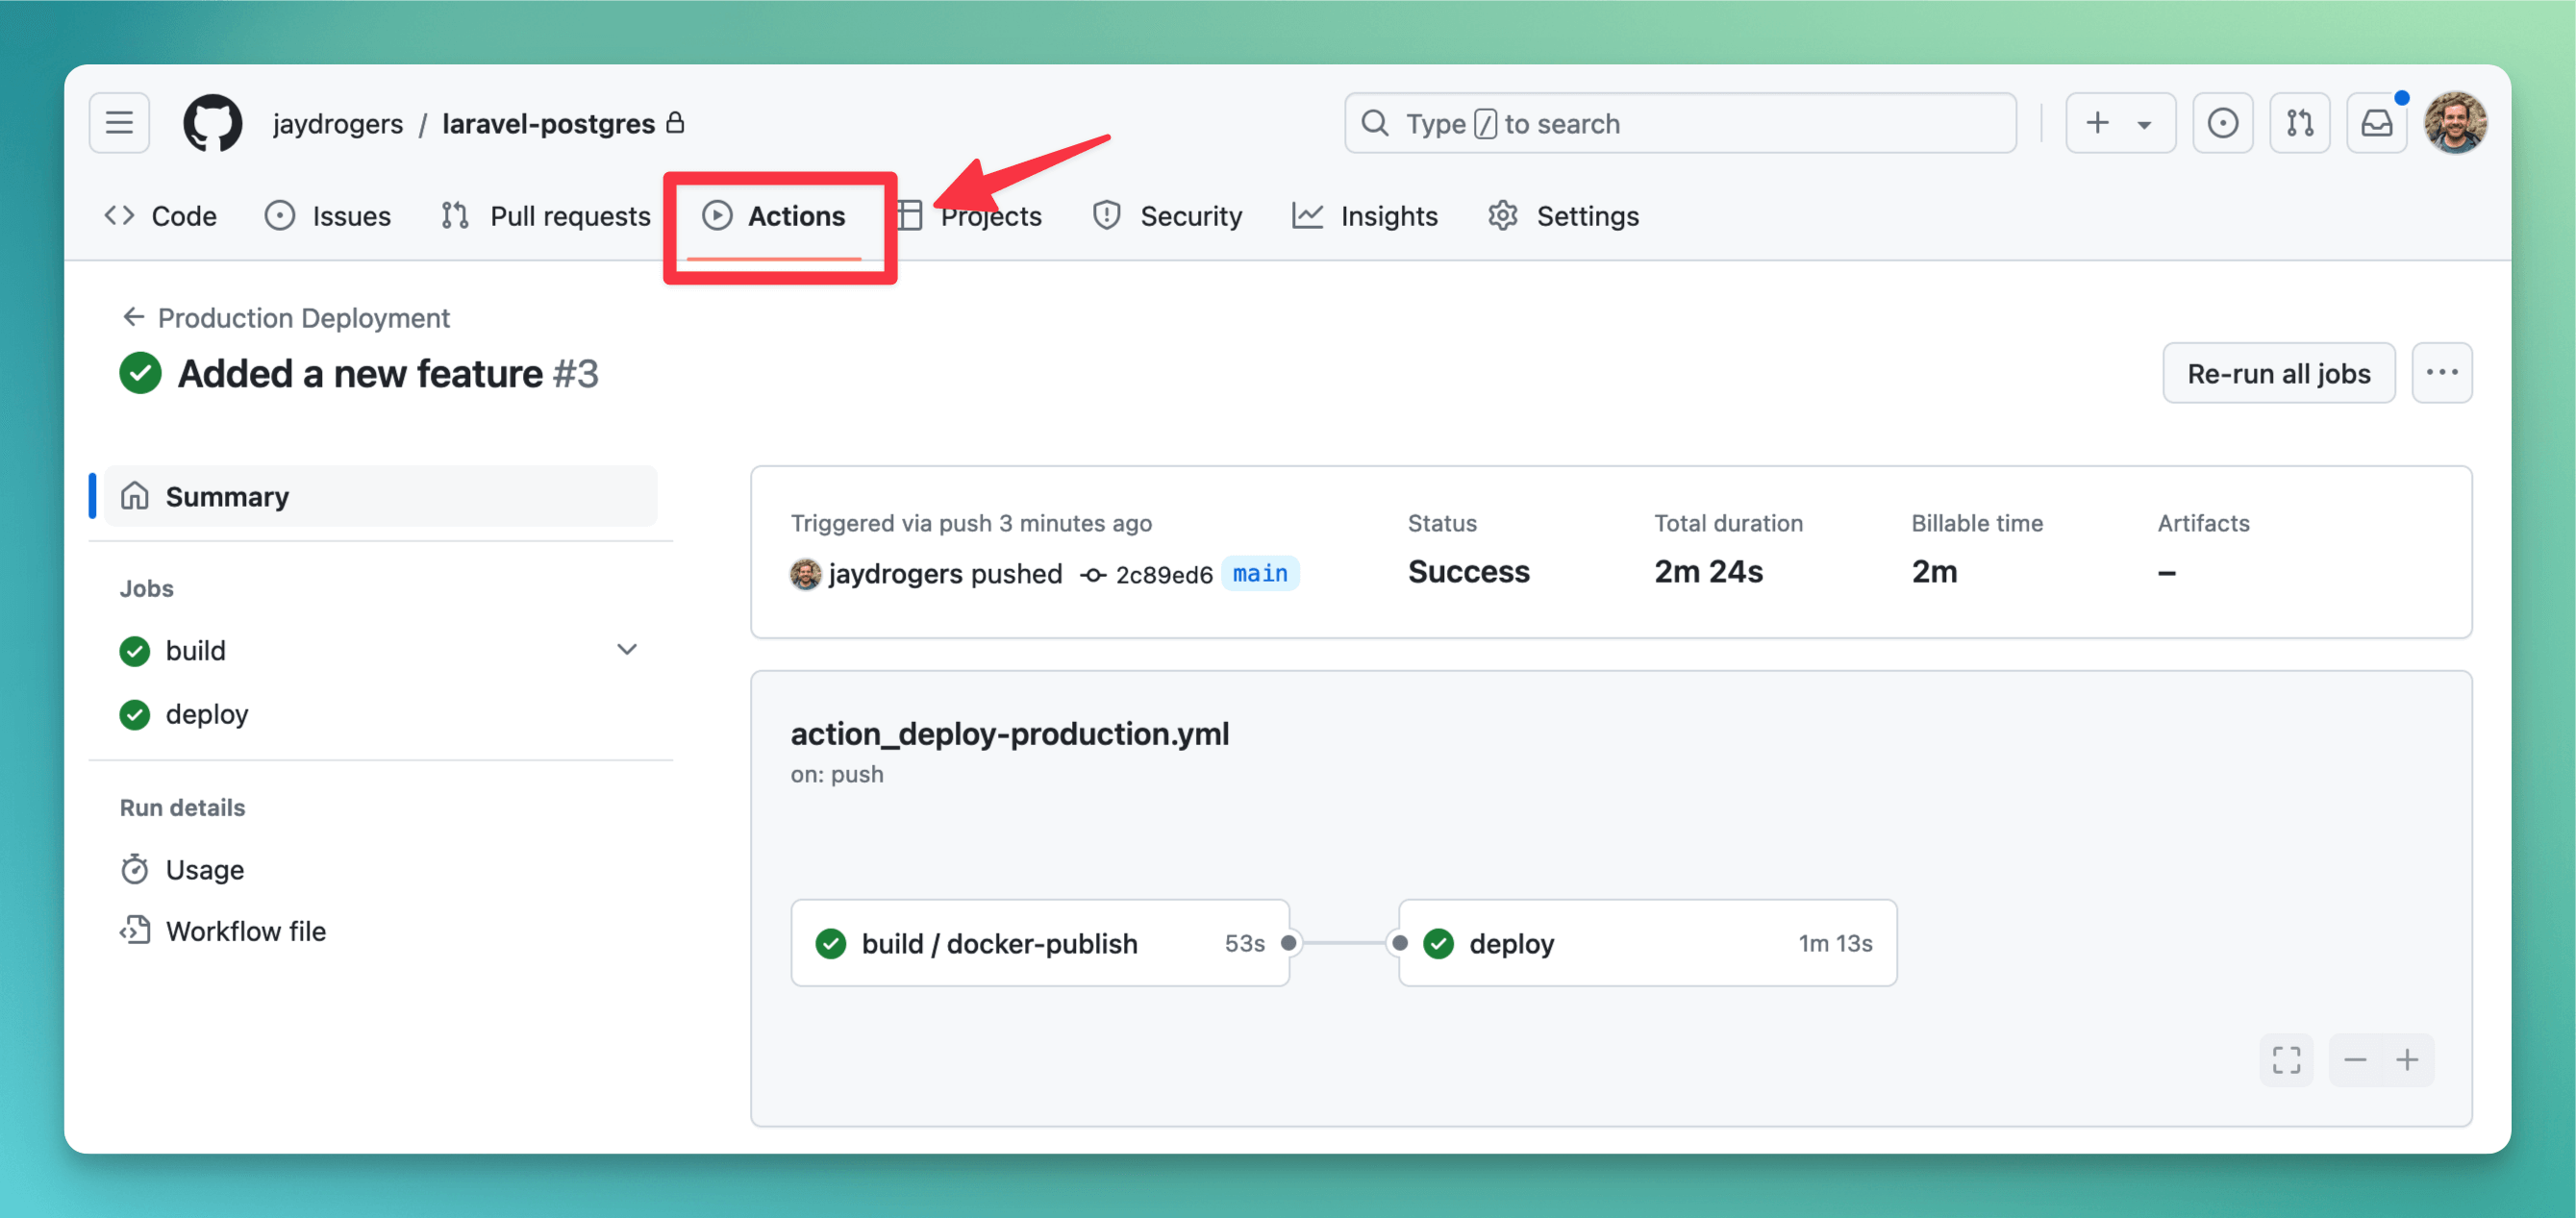
You can watch the status of your deployment by going to the Actions tab in your repository. You can see the status of the deployment and any logs that are generated.

Using self-hosted runners to improve security
If you'd like to improve the security of your deployments, you can use self-hosted runners. This will allow you to run your deployments on your own infrastructure instead of GitHub's infrastructure. You can learn more about self-hosted runners in the GitHub Actions documentation.
Once you have a self-hosted runner set up, you can use a firewall to limit SSH access to your server only from IP addresses that are associated with your self-hosted runner and a dedicated VPN for your team.
