Connecting to your database
How databases are configured
When you use Spin, databases are configured through environment variables (the .env file or .env.<environment> file). When your databases start for the first time on the your machine, it uses whatever is in the environment variable file to create the database with the correct credentials.
.env file after you've already started the database, the database will not automatically update to your new credentials. You'll have to manually update the credentials in the database itself. Refer to the official Docker image documentation for the database you're using for more details.Connecting to a local development database
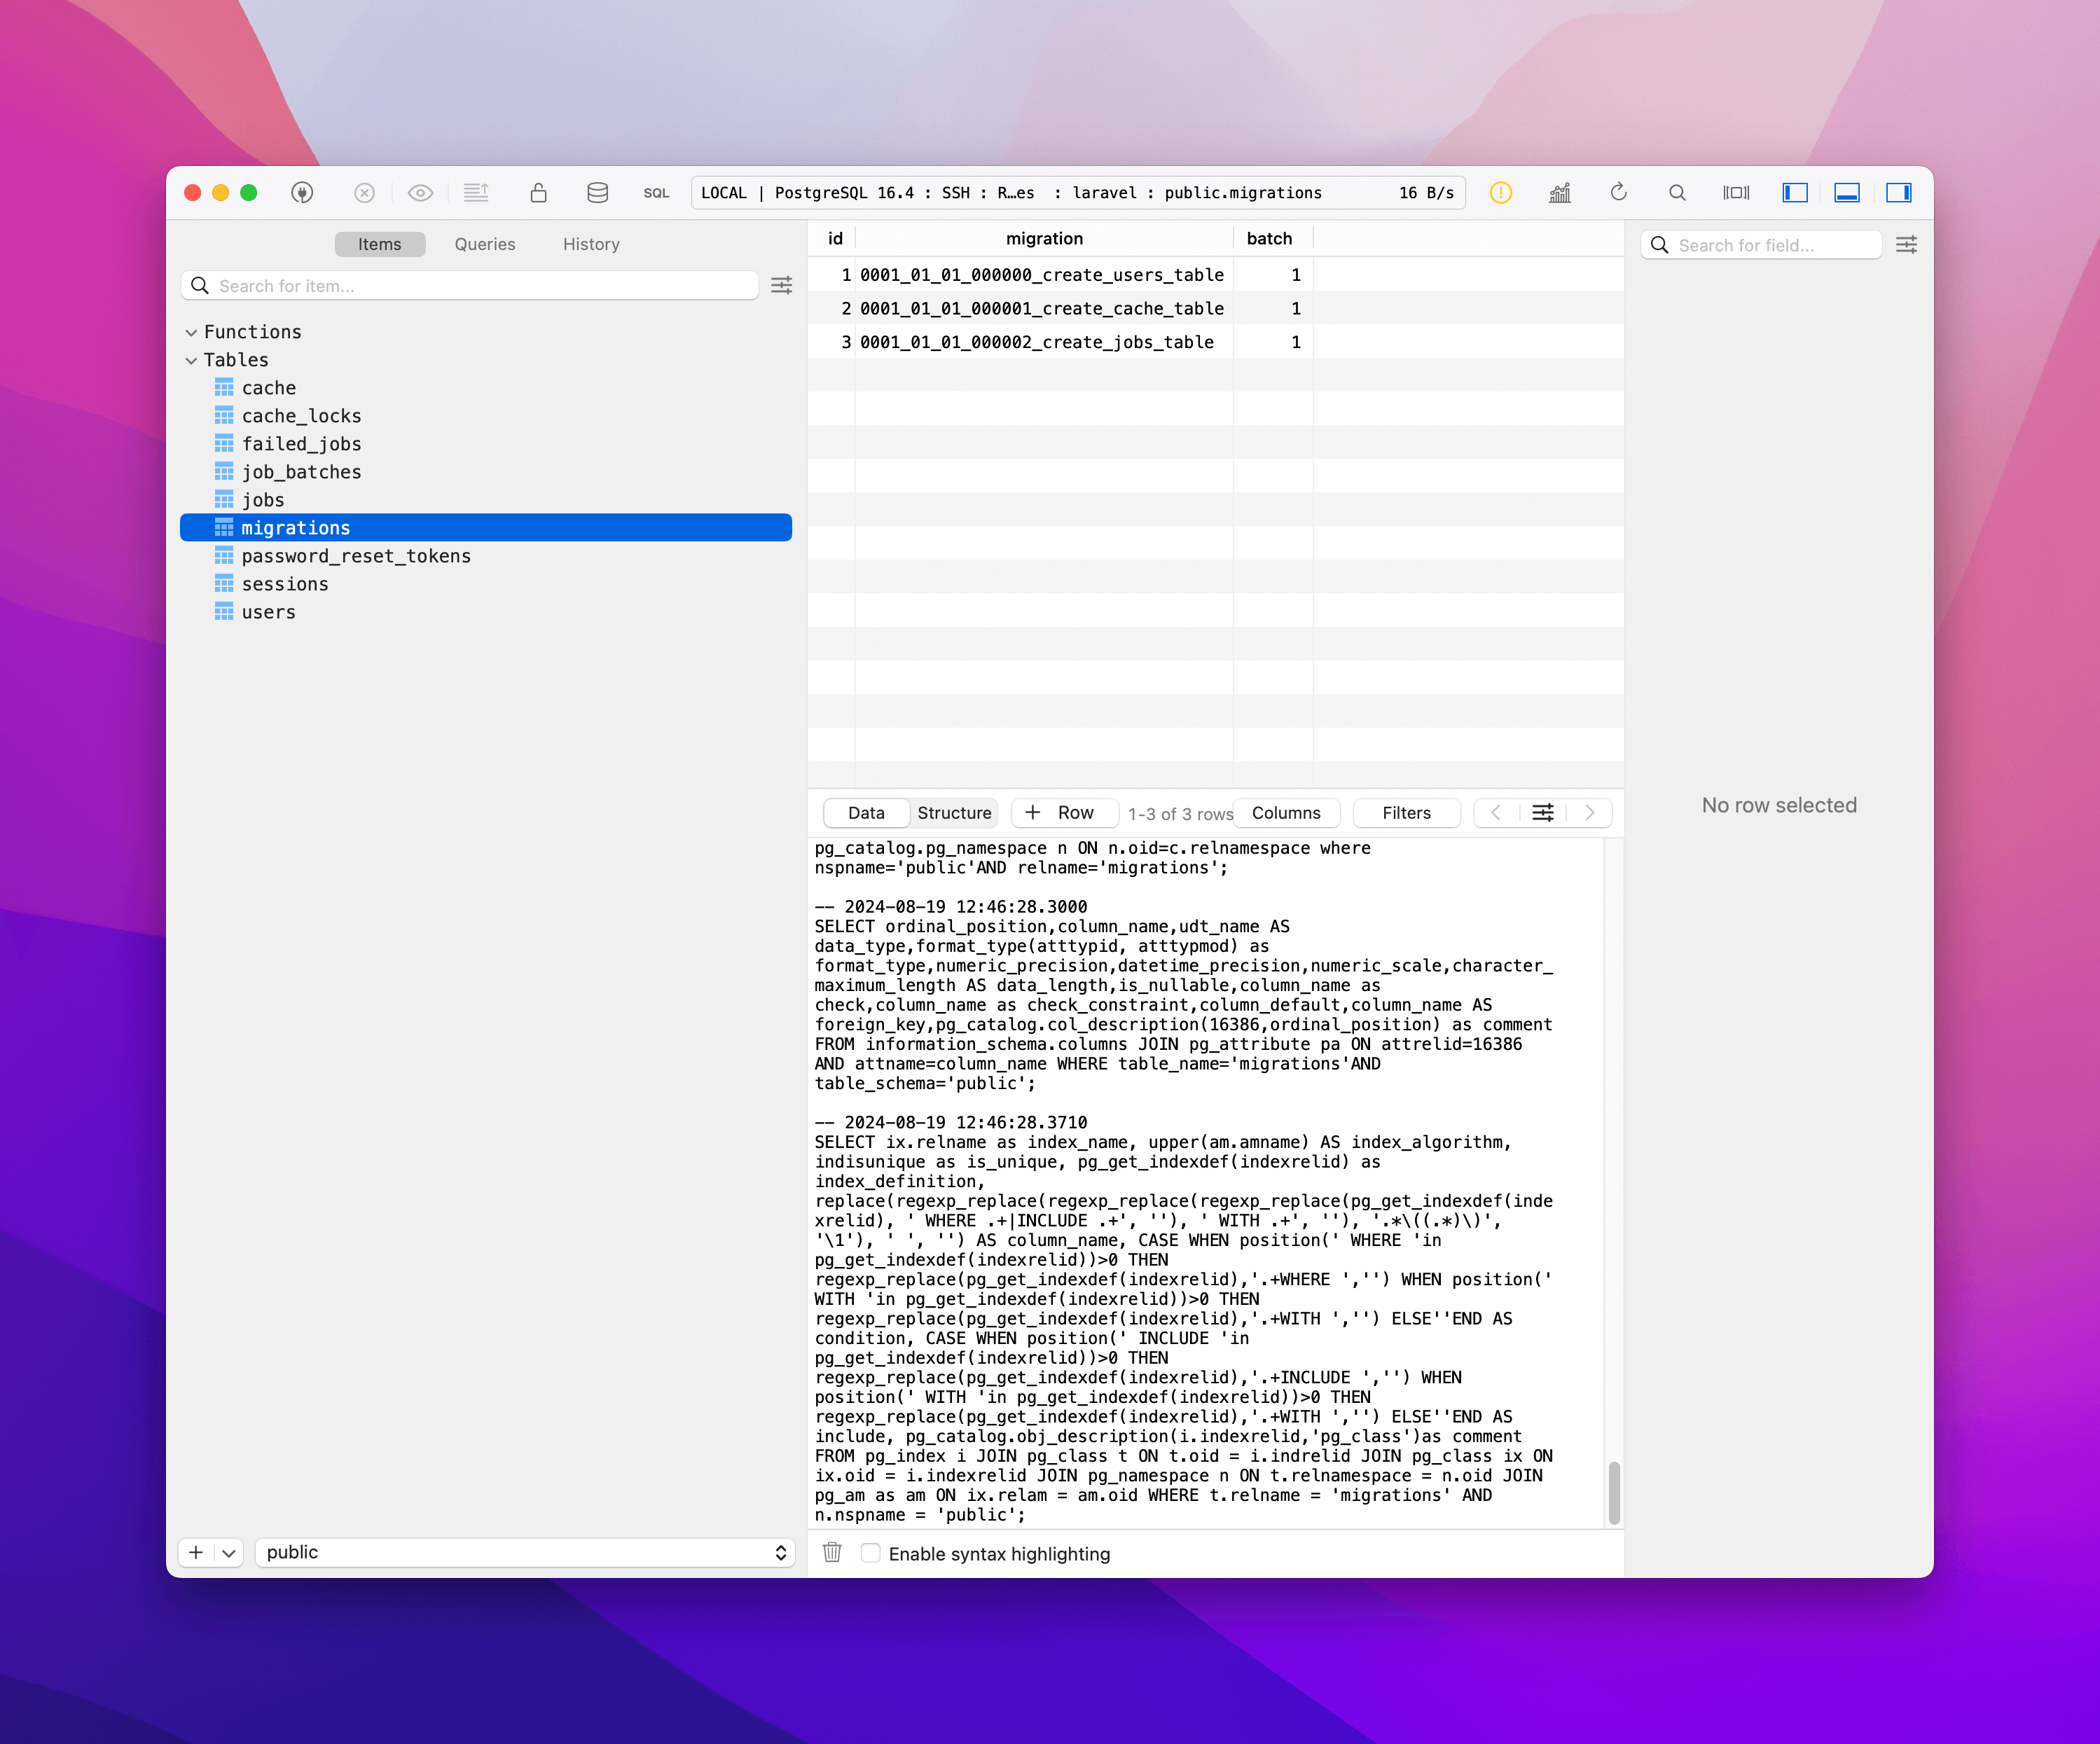
We can use a GUI manager like TablePlus to connect to our local development database. To do so, ensure you have the spin up command running and then open TablePlus. When you create a connection, we can use the credentials from your .env file.
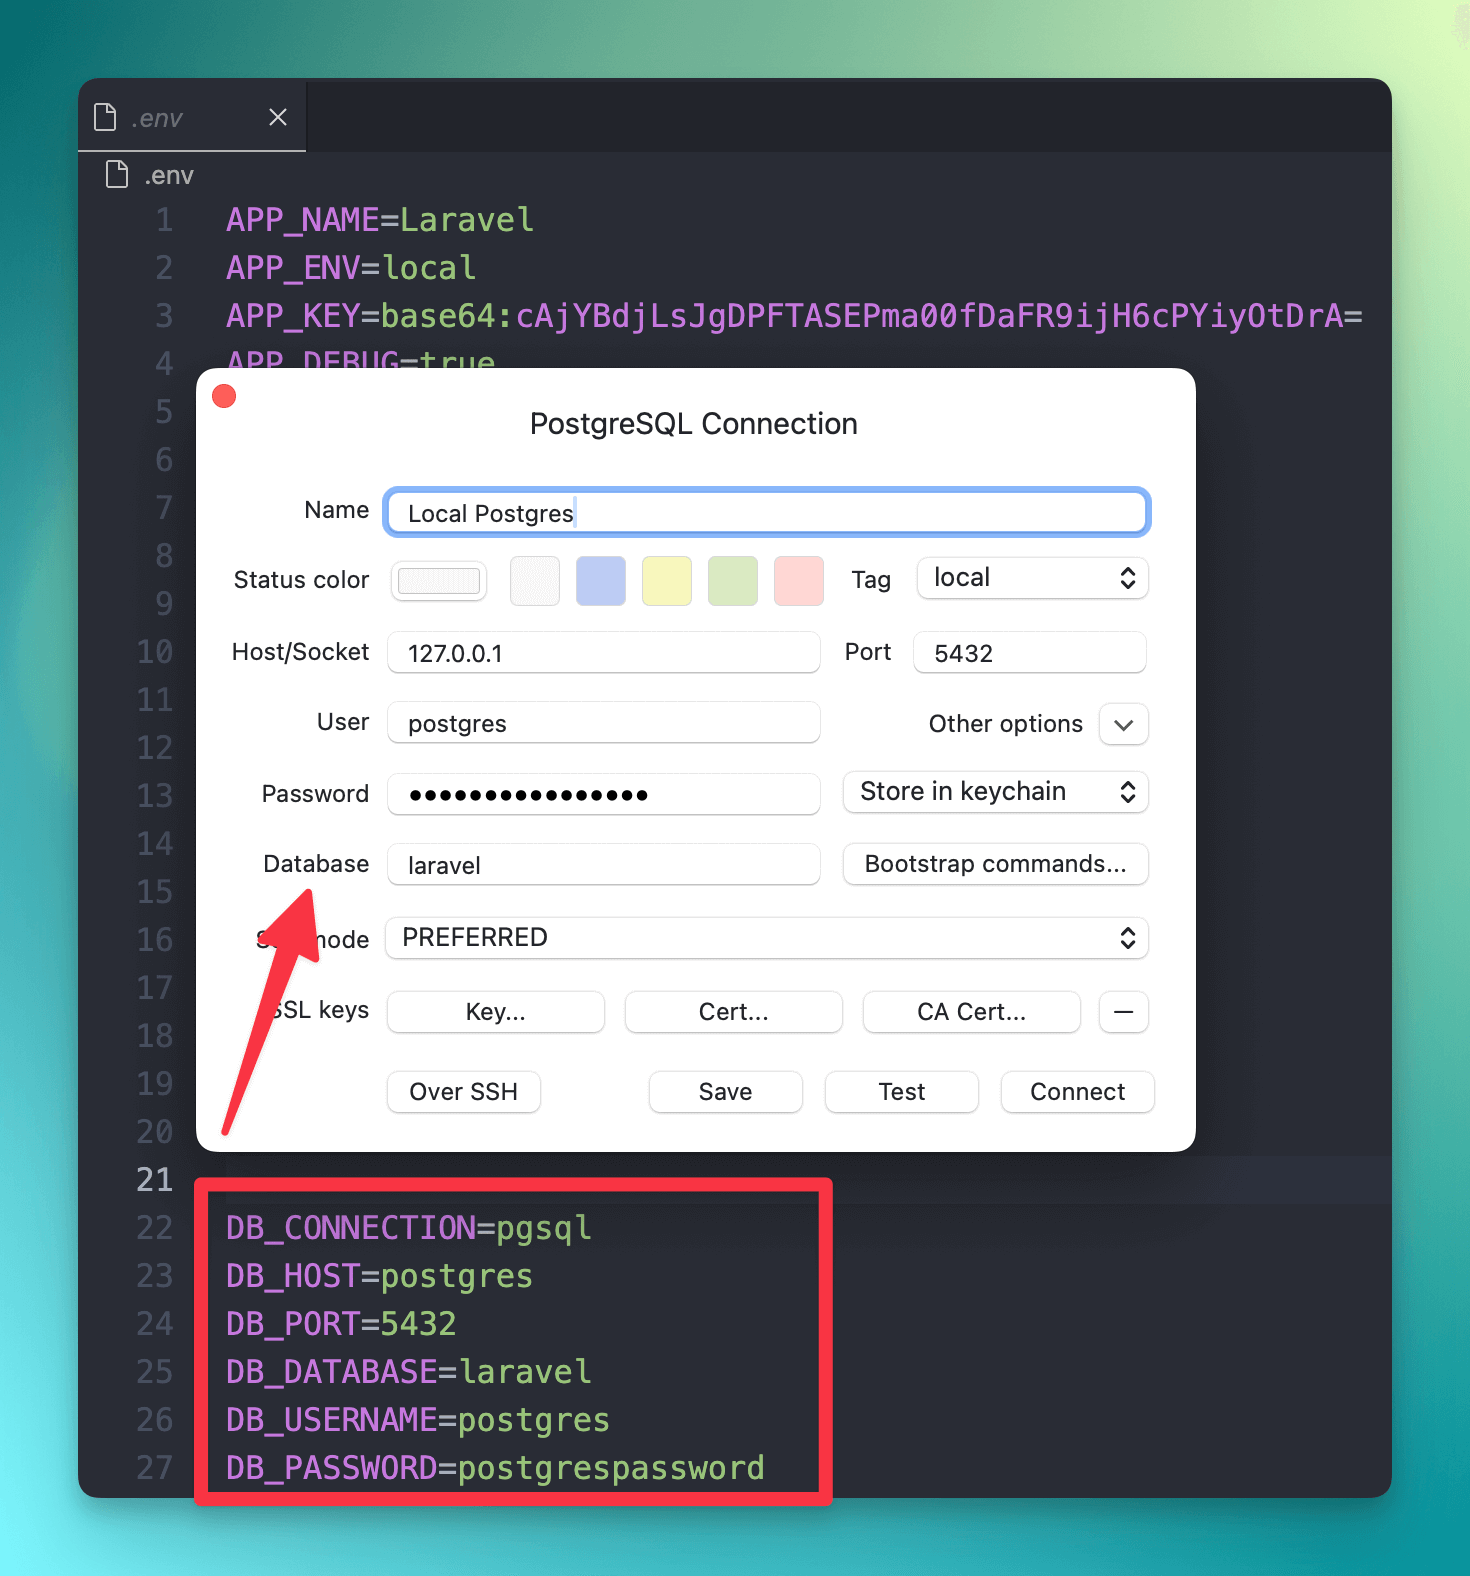
127.0.0.1 instead of postgres, mysql, or mariadb. This is because we expose the ports to your local machine in docker-compose.dev.yml.| Field | Value |
|---|---|
| Host/Socket | 127.0.0.1 (we expose the ports to your local machine) |
| Port | Value of DB_PORT in your .env file |
| User | Value of DB_USER in your .env file |
| Password | Value of DB_PASSWORD in your .env file |
| Database | Value of DB_DATABASE in your .env file |
| Over SSH | ❌ Do not use. We want a direct connection to your local machine. |
Connecting to a production database
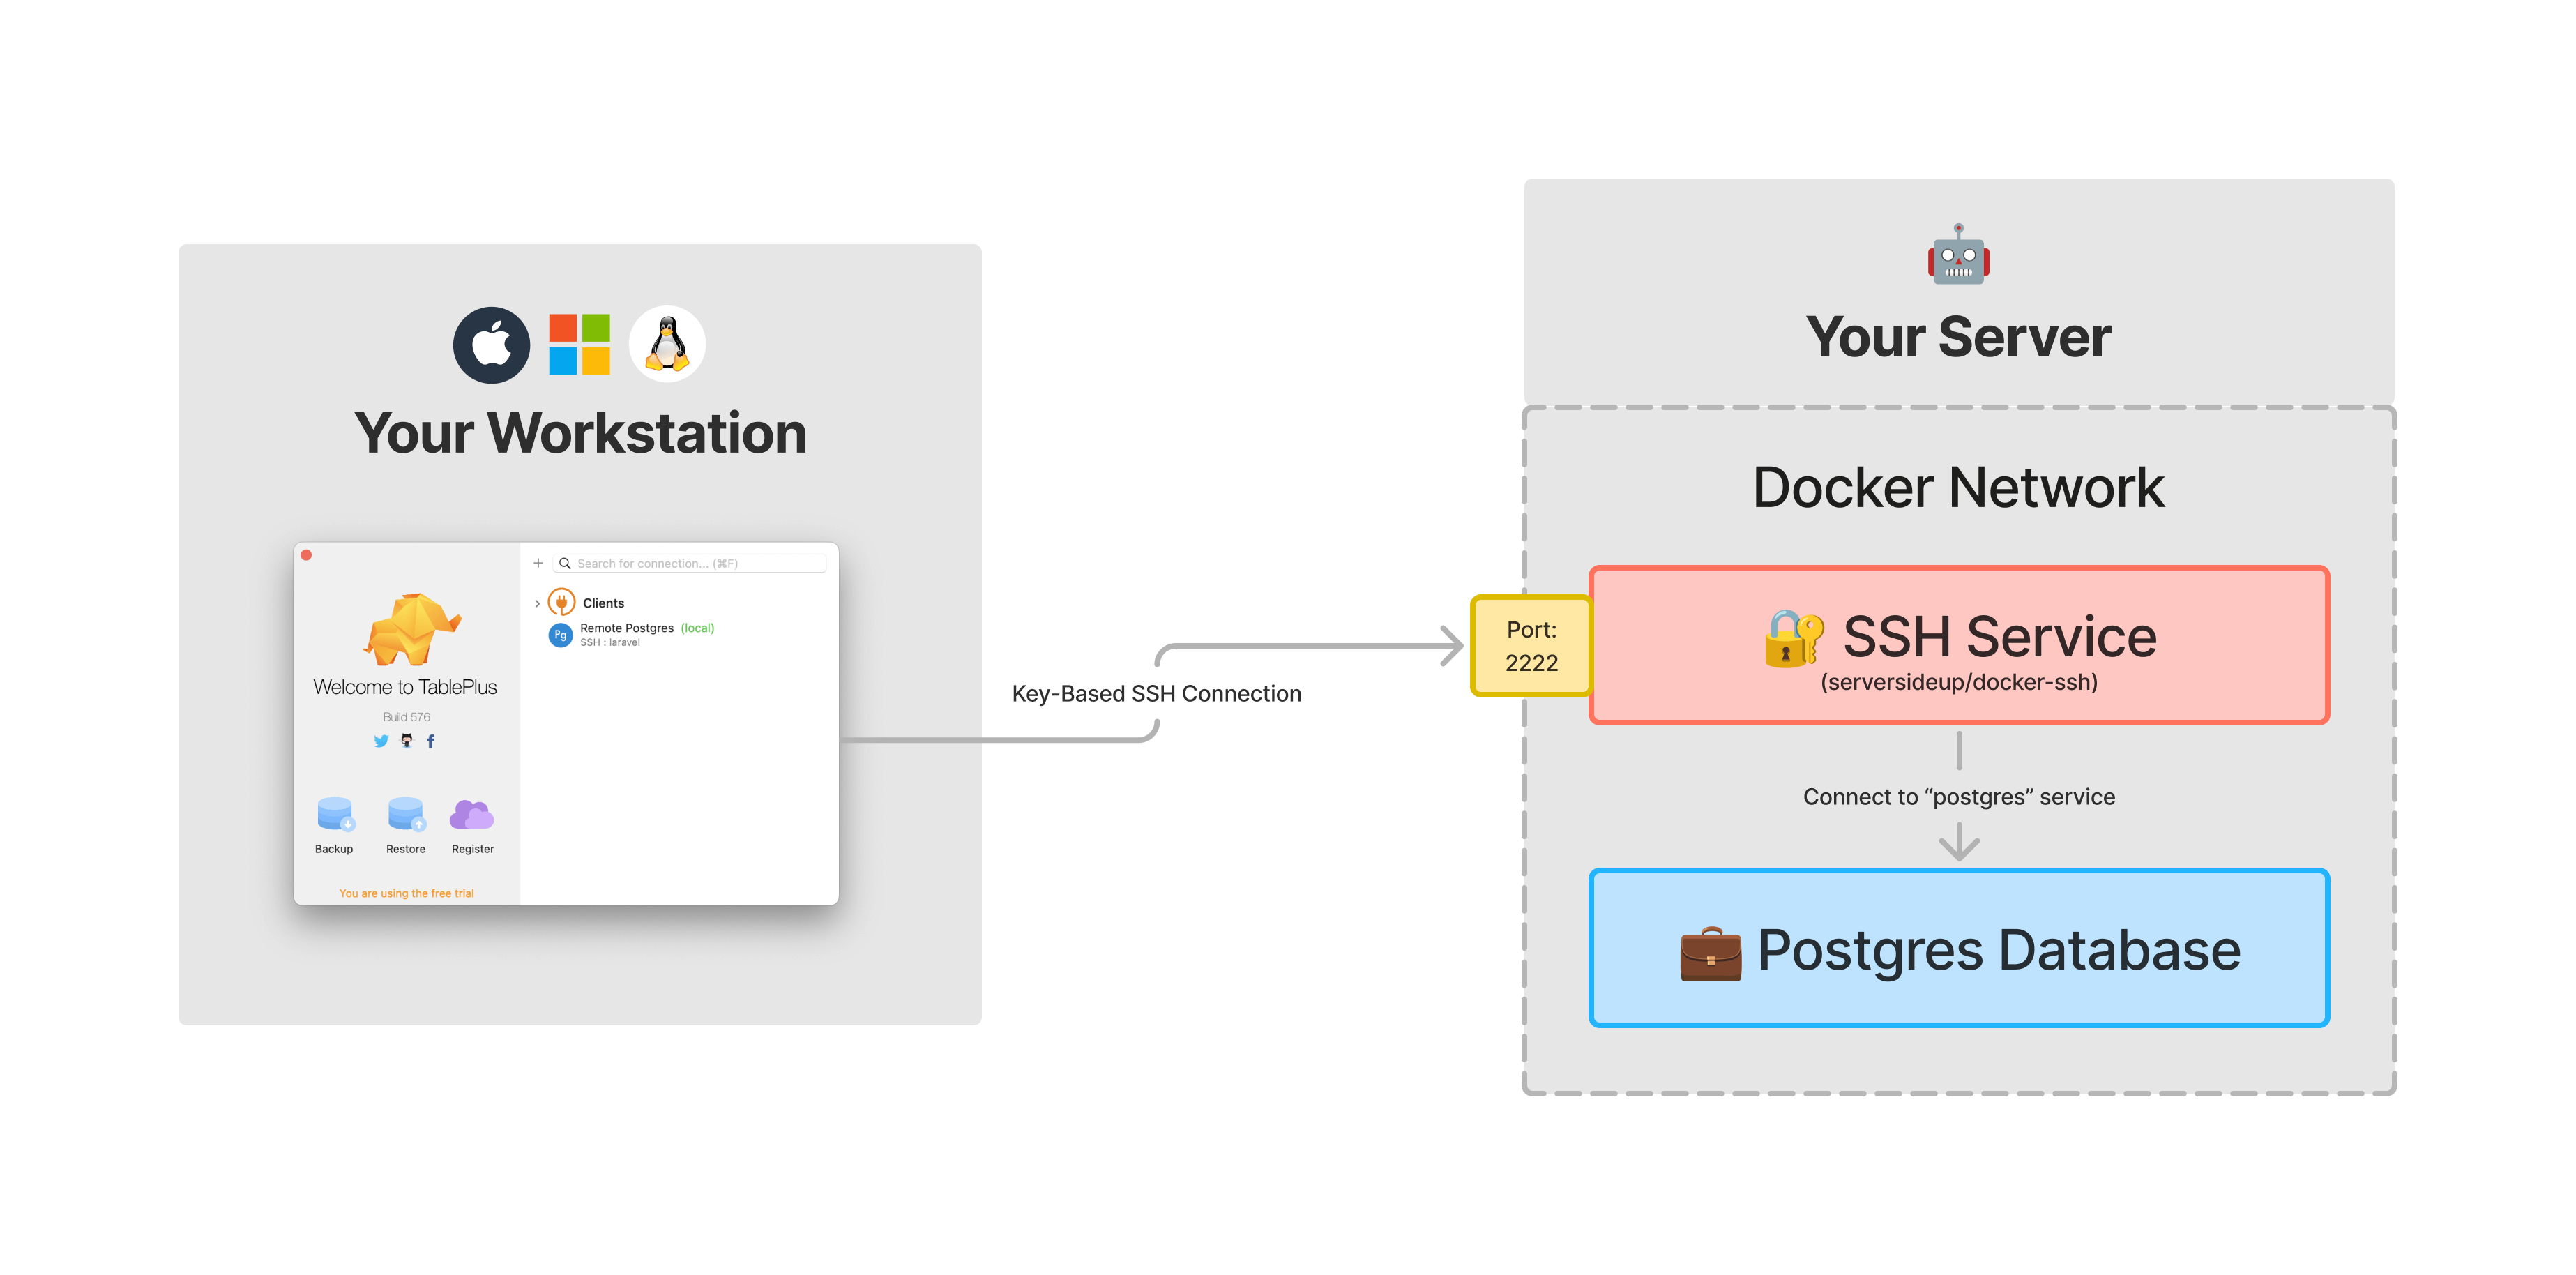
Since exposing database ports is a security risk, we don't expose the database ports in production. Instead, you can use an SSH tunnel to connect to your database. We do this by using a secure SSH tunnel with key-based authentication with our open source image called serversideup/docker-ssh.
How it works
In your docker-compose.prod.yml file, you will notice a service called ssh This service will:
- Create a docker service called
sshwithserversideup/docker-ssh - Expose a secure SSH service on port
2222 - Configure the SSH username to
tunnel - Allow keys to connect that are set by
AUTHORIZED_KEYS - Allow IP addresses to connect that are set by
ALLOWED_IPS
  ssh:
    # We use an SSH image so we can securely tunnel into the Docker network with
    # tools like Sequel Pro, TablePlus, Sequel Ace, etc.
    # Learn more how to secure your tunnel here: https://github.com/serversideup/docker-ssh
    image: serversideup/docker-ssh:v2.0.0
    ports:
      - target: 2222
        published: 2222
        mode: host
    environment:
      # Be sure to set the authorized keys in the .env file or GitHub Actions secrets
      AUTHORIZED_KEYS: "${AUTHORIZED_KEYS}"
      # You can lock to a specific IP too (AllowUsers [email protected])
      ALLOWED_IPS: "AllowUsers tunnel"
Configure "AUTHORIZED_KEYS" for GitHub Actions
We made the process stupid simple for people using GitHub Actions. When you're going through the process of setting up GitHub Actions, the AUTHORIZED_KEYS variable will automatically be configured by looking at your .spin.yml file and setting the AUTHORIZED_KEYS variable to any public keys set for any sudo users.
# This automatically configures the AUTHORIZED_KEYS variable for you
spin configure gha
If you need to update the AUTHORIZED_KEYS variable, you can simply update your .spin.yml and run the spin configure gha command again. You can verify the secret is set by going to Settings > Secrets > Actions > AUTHORIZED_KEYS in your GitHub repository.
Configure "AUTHORIZED_KEYS" for "spin deploy"
Setting the AUTHORIZED_KEYS variable for "spin deploy" is just as easy as GitHub Actions. Every time you run spin deploy, it will automatically set and update the .infrastructure/conf/ci/AUTHORIZED_KEYS file, which will include any public keys from users in the sudo group that are set in your .spin.yml file. The deploy command will automatically load the contents of this file into the AUTHORIZED_KEYS environment variable during the deployment process.
Locking down your SSH tunnel
If you'd like to take security a step further, you can lock down the IP addresses that can connect to your SSH tunnel. This is done by setting the ALLOWED_IPS environment variable:
  ssh:
    image: serversideup/docker-ssh:v2.0.0
    ports:
      - target: 2222
        published: 2222
        mode: host
    environment:
      AUTHORIZED_KEYS: "${AUTHORIZED_KEYS}"
      # 👇 We lock to the specific IP address of 1.2.3.4
      ALLOWED_IPS: "AllowUsers [email protected]"
The above configuration will only allow the IP address 1.2.3.4 to connect to the SSH tunnel. If anyone tries to connect from any other IP address, they will be denied access.
Create a connection in TablePlus
You'll need to make a deployment via spin deploy or using GitHub Actions. You need to make sure the deployment is successful and that the SSH tunnel is running. Once that's ready, you're ready to connect TablePlus to your database.
Create a new connection and click Over SSH.
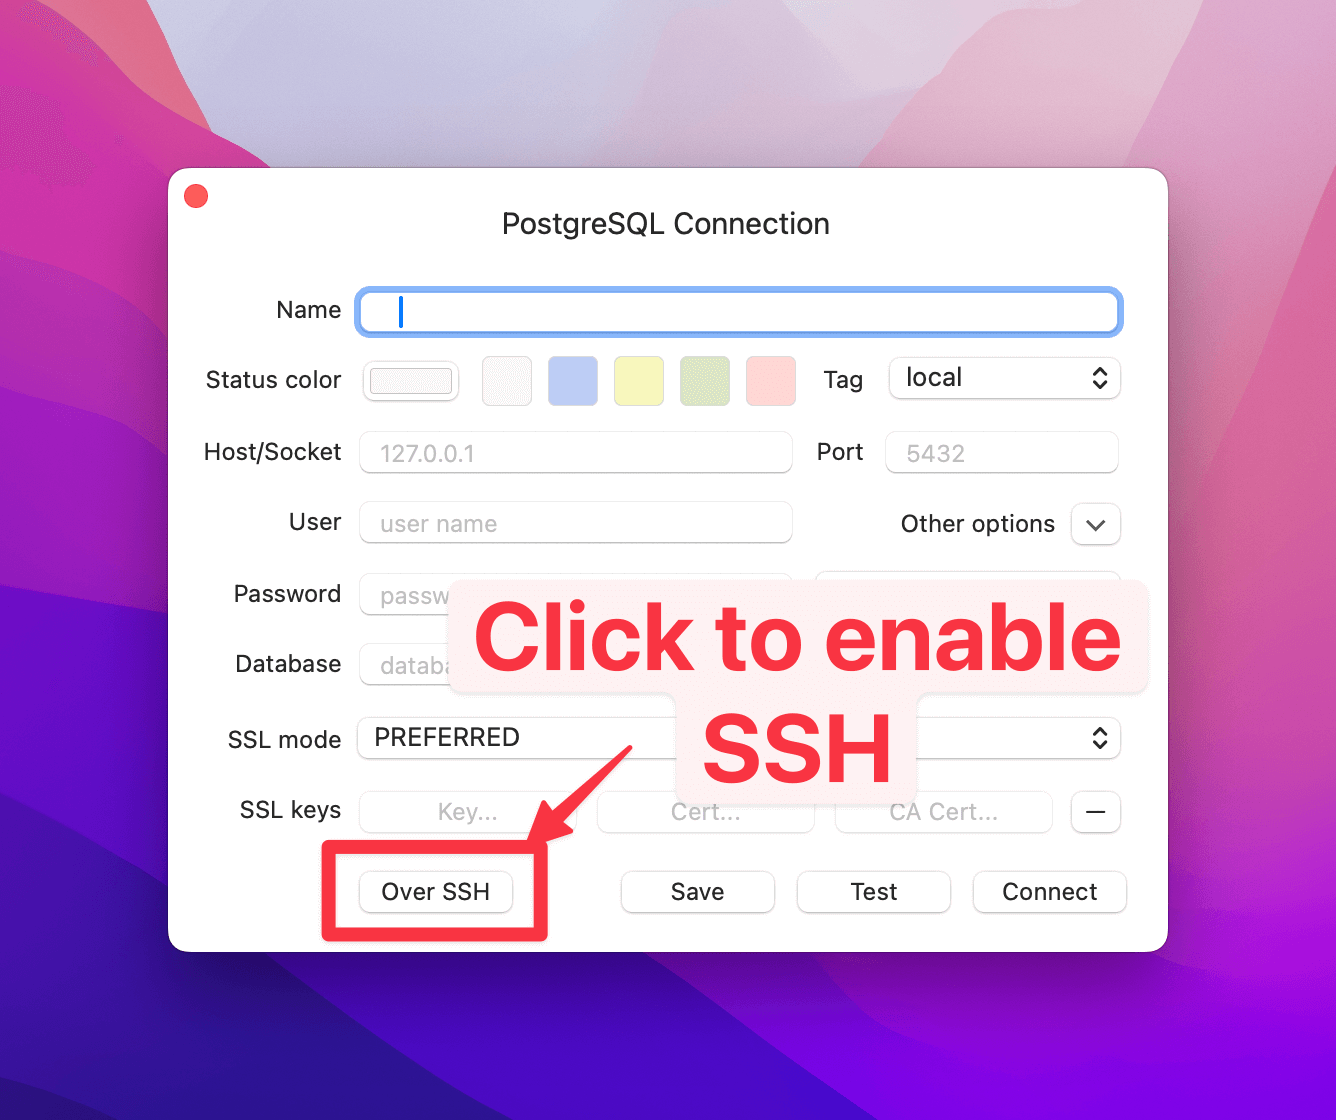
You'll see the menus expand out where you can add more details.
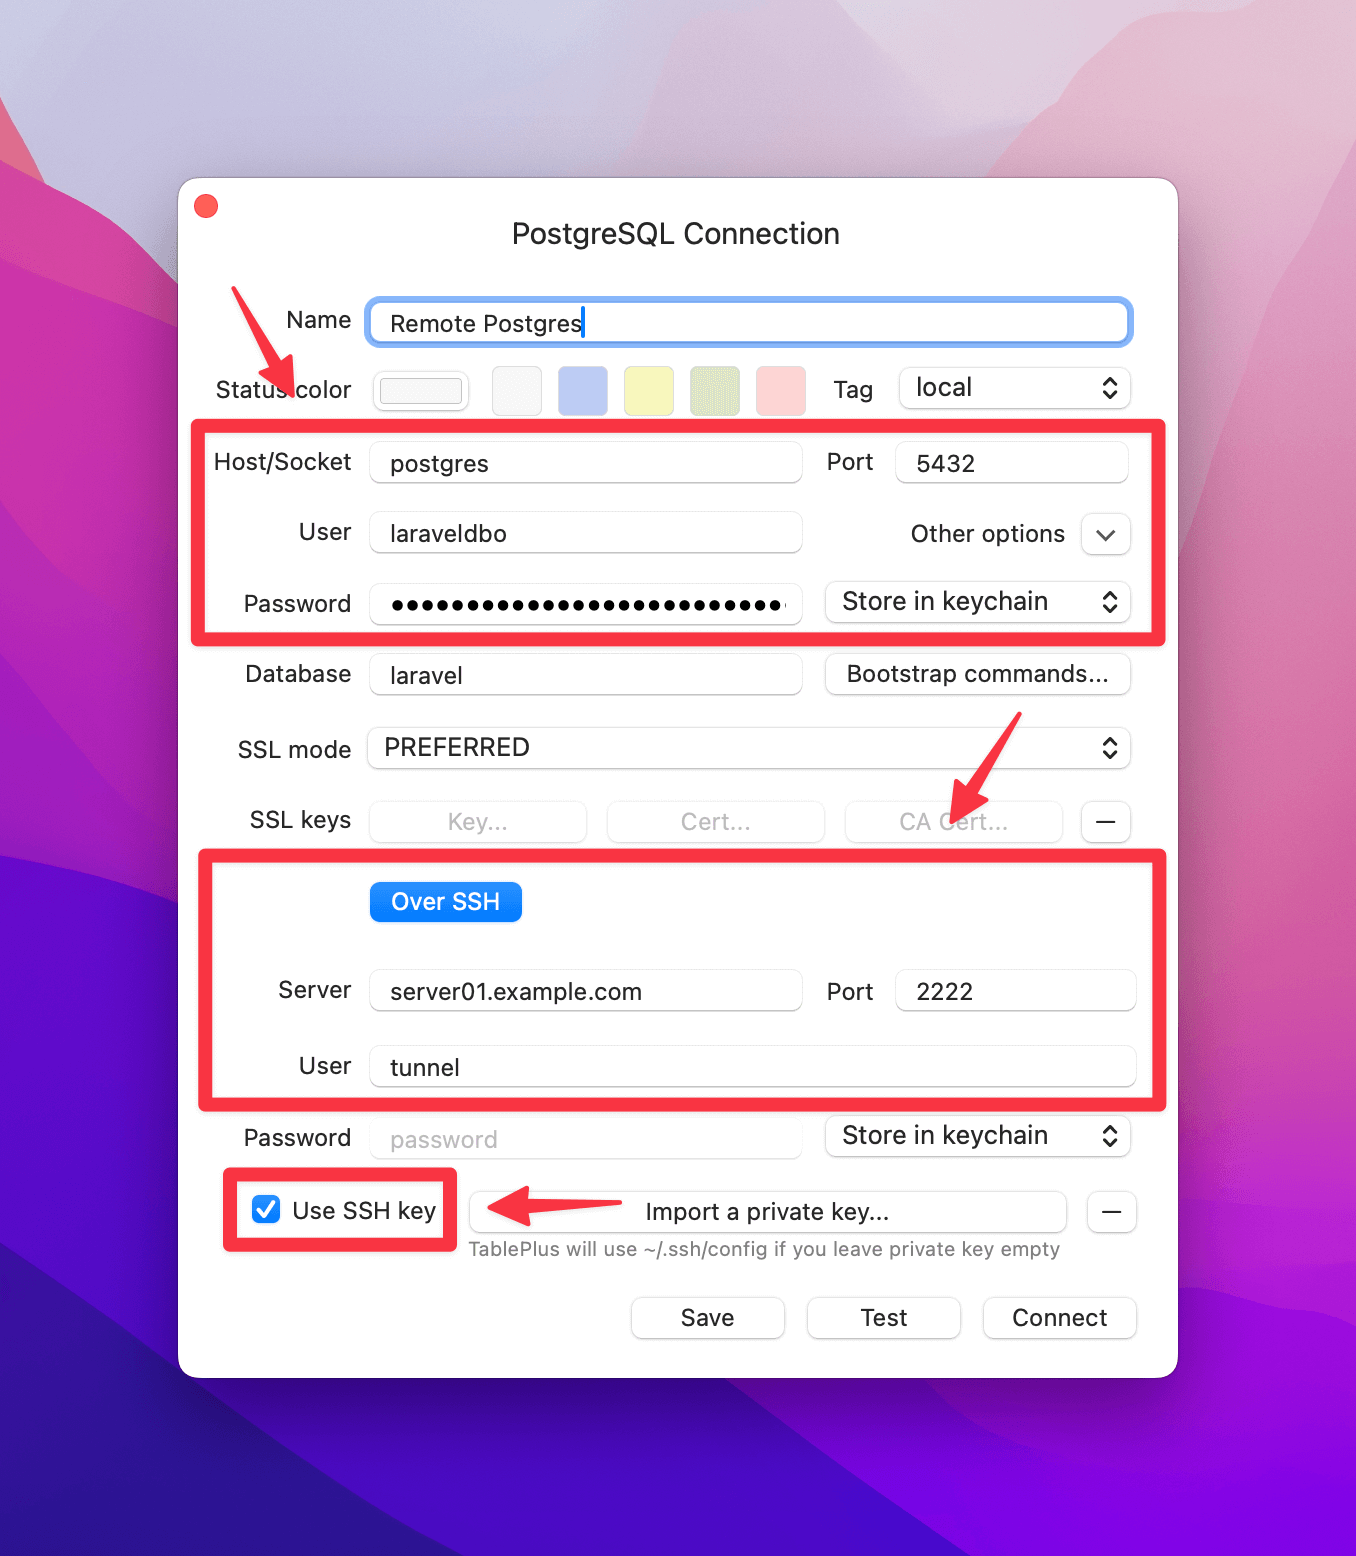
Use the table below to help you configure your connection:
postgres, mysql, or mariadb. This is because the SSH tunnel will connect to the service name in the Docker network.| Field | Value |
|---|---|
| Host/Socket | postgres, mysql, or mariadb (it's the service name in the Docker network) |
| Port | The value of DB_PORT in your .env.<environment> file |
| User | The value of DB_USER in your .env.<environment> file |
| Password | The value of DB_PASSWORD in your .env.<environment> file |
| Server | (Your server's hostname or IP address) |
| Port | 2222 (This is DIFFERENT from your regular SSH connection) |
| User | tunnel (This is the default user for the SSH container and should be the same for all users) |
| SSH Password | ⚠️ Leave this blank. |
| Use SSH key | ✅ Check this box. |
| Import a private key | For most people, if your private key is located in ~/.ssh the connection should work by default. If you need to select a specific private key, then click this button to select. |
Once you've filled in the details, click Connect and you should be able to connect to your database.
Troubleshooting your connection
If you're having issues connecting to your database, try debugging your SSH connection first.
# Attempt to connect to the SSH tunnel
ssh -p 2222 tunnel@<your-server-ip>
If you're able to connect, then you know the SSH tunnel is working. Once connected, you can run ping <database-service-name> to see if the database service is responding.
# The service name could be postgres, mysql, or mariadb
ping <database-service-name>
If you're able to ping the service, then you know the database service is responding. The final step is to ensure your database credentials and settings are correct (double check your .env.<environment> file and your .spin.yml file).
.env file after you've already started the database, the database will not automatically update to your new credentials. You'll have to manually update the credentials in the database itself. Refer to the official Docker image documentation for the database you're using for more details.Configuring your hosts file
In order for your local development environment to work correctly, you'll need to configure your hosts file. This file tells your computer where to look for specific domain names. This is important for local development because you'll be using domain names like `laravel.dev.test` instead of `localhost`.
Customizing Development URLs
This guide will walk you through how to customize your development URLs in with Spin Pro. Instead of using `laravel.dev.test`, you can use `my-awesome-project.test` or any other domain you'd like.